Friday, May 27, 2011

Te@ch Me Prezi Part 4: Adapting a Reading Text


Prezi is one of the leading Web 2.0 applications embraced especially by language teachers since it has the capacity to present information in a completely different way. In my previous Prezi posts, I have tried to show the basics of how to create a Prezi. In this post, I am going to show one way of using a Prezi in the reading classroom. Using Prezi as a tool to accompany the reading class can be an efficient and fun way to address the students' perceptions and their desires to experience something different. Here is how you can do it:

Monday, March 14, 2011

Class Blogging Tips and Tricks: How to embed objects into your posts


Class Blogging Tips and Tricks: Embedding Objects

One of my major topics when I hold training sessions on blogging is how to embed certain objects into your blogs. These objects can be videos, Prezis, Scribd documents, etc. The procedure is very simple: Find the source of your object (YouTube, Vimeo, Prezi, etc.), look for the embedding code (which is always somewhere on the page) and paste it in your post (NOT in the composing area, but in the "Edit HTML" area). All seemed to go well until I noticed posts like this:


What happened here is that the object is too wide to fit into your posting area. Every blog has a posting area with a certain width. Before embedding an object, you should have an idea about approximately how wide your posting area is, so that you can avoid problems such as seen above. There are two ways to avoid this problem:
Solution #1: Adjust the width of your template:
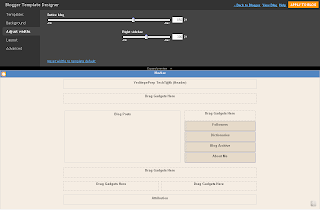
Adjust width by moving slider
First go to Design==>Template Designer==>Adjust widths. Here you can adjust the width of your blog by moving the slider. You can also change the width of your sidebar. However, sometimes, the problem continues because in some templates the maximum width is still not enough to accommodate your videos. In this case, you have to get to the root of the problem, which brings us to the second solution:

Solution #2: Adjust the width of the video:
When objects (videos, Scribd documents, Prezis) are embedded into posts, their widths and heights are predetermined by the source site, such as Youtube or Prezi. In the past, the width and height information used to be only in the embed code (HTML code) but now you can determine these specifications before you copy the embed code.

Click "embed" in YouTube to see size options                     Change width manually in the code

After you click the "embed" button in Youtube, you will see that it offers a selection of sizes that you can choose from. When you click one, the code will automatically change. Previously, I had chosen a 640pxs width, which was too wide. This time, I will try 560pxs and see how that works out. It is a little game of trial and error to get the right width size number, but you have to do that  only once and then you can use the same number for all of your embedded objects. However, there might be sites where this option is not present. Then you will have to do this manually. After pasting the embed code into your post, just search for a line that has the word "width" in it. You will see that "width" is followed by a number just like the code in the YouTube example. Change the number to a size number that will fit your posting area and the size of your video will change.

Monday, March 7, 2011

Class Blogging Tips and Tricks: How to open link in a new window

The emergence of blogging services like Blogger and Wordpress has made blogging a very easy experience. A lot of teachers have started to blog in search of finding new ways to make students become more active in the language learning process. Teachers blog to share resources, videos, pictures and all kinds of information with their students and the rest of the world. All of this makes blogging a rich experience both for the teacher and the student.
With these posts, I want to share my solutions to little problems that our teachers have encountered during their blogging experience. I am sure that others out there had the same problems and are looking for ways to solve them. Well, here they are:

One recent problem that teachers encounter with their blogs is with Blogger's "link list" gadget. They use this gadget to provide students with useful links such as dictionaries, video sites, or grammar and vocabulary sites. However, their complaint is that whenever the students click the links, the sites open in the same window instead of opening in a new window. The same is valid for links that are given in a blog post. They, too, open in the same window instead of opening in a new one. Obviously, teachers want their students to continue reading their blogs while browsing dictionaries or other reference sites. Unfortunately, Blogger does not have a setting where you can enable such a feature. After extensively searching the internet, I have found the solution to both of the problems. Both can be solved by making little changes to the HTML code:

Friday, February 18, 2011

Te@ch me Prezi Part 3: The Bubble Menu

The Bubbles:


The Bubble Menu
The Text Editor
1. Write: This is the default bubble when you first start your editor. When in write mode, you can use your canvas to insert (write or copy/paste) text. You place your mouse anywhere on the canvas and click once (not a double click!). When you see a cursor flashing on your canvas, you can start writing. The moment you start typing, Prezi will open the text editor. In the editor, you can align your text and decide whether you want it to be part of a title or a body. Once you click "Ok", your text will become an "object" on your canvas, which you can manipulate at any time. Don't forget that everything you place on your "canvas" becomes an object that you can manipulate (zoom in, zoom out, rotate, etc...).


Te@ch me Prezi Part 2: The Basics

In my last blog post, I tried to explain what Prezi actually is and how it should be (or shouldn't be) compared to PowerPoint. In this post, I will try to explain some of the basics of using Prezi.

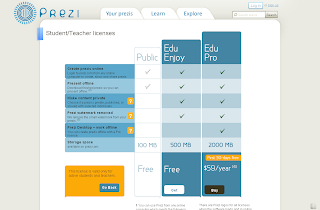
Signing up: The sign-up process is pretty easy. All you have to do is to decide which license you need. Prezi offers three licenses: Public, Enjoy and Pro. The Public license is free. However, if you are a teacher, there is another, more delicious option for you: Prezi offers a free teacher/student license which is the same with the $59 Enjoy license. It allows offline viewing (you can download your presentations), private (you don't have to make them public) and watermark free presentations (you can insert your own logo). To get this license, you have to provide an e-mail address that shows your teacher/student status. This can be either an .edu or a .k12 address. Prezi does not accept any other e-mail addresses for a teacher/student account. Though, here you can find an alternate way that Prezi suggests to get an .edu address.


After you have received your confirmation e-mail, you can log on to the site and start creating your own Prezis.

First steps: After clicking the "New Prezi" button you will be asked to give a title for your presentation. You can also provide a brief description about your presentation, so that people will know if it fits their needs.


The Editing "Canvas": Now you are at the editing area of your Prezi. This is the place where you are going to design your Prezi presentations. On the upper left corner of the page you will see a "Bubble Menu". Here are all the tools that you need to create your presentations. You can click each "bubble" for a certain tool and other related tools will appear.
The Editing Canvas


After this point, you will start creating your presentation. To start editing your Prezi,  you should become familiar with the "Bubbles" Menu, which will be the main topic of Te@ch me Prezi: Part 3.

Click here to continue reading Part 3