Class Blogging Tips and Tricks: Embedding Objects
One of my major topics when I hold training sessions on blogging is how to embed certain objects into your blogs. These objects can be videos, Prezis, Scribd documents, etc. The procedure is very simple: Find the source of your object (YouTube, Vimeo, Prezi, etc.), look for the embedding code (which is always somewhere on the page) and paste it in your post (NOT in the composing area, but in the "Edit HTML" area). All seemed to go well until I noticed posts like this:
What happened here is that the object is too wide to fit into your posting area. Every blog has a posting area with a certain width. Before embedding an object, you should have an idea about approximately how wide your posting area is, so that you can avoid problems such as seen above. There are two ways to avoid this problem:
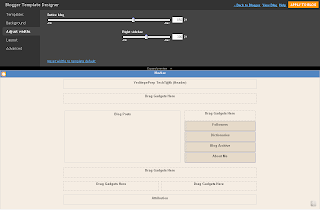
Solution #1: Adjust the width of your template:
 |
| Adjust width by moving slider |
First go to Design==>Template Designer==>Adjust widths. Here you can adjust the width of your blog by moving the slider. You can also change the width of your sidebar. However, sometimes, the problem continues because in some templates the maximum width is still not enough to accommodate your videos. In this case, you have to get to the root of the problem, which brings us to the second solution:
Solution #2: Adjust the width of the video:
When objects (videos, Scribd documents, Prezis) are embedded into posts, their widths and heights are predetermined by the source site, such as Youtube or Prezi. In the past, the width and height information used to be only in the embed code (HTML code) but now you can determine these specifications before you copy the embed code.
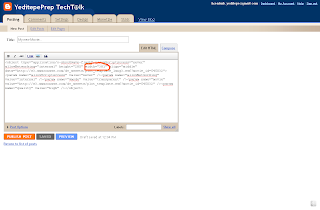
After you click the "embed" button in Youtube, you will see that it offers a selection of sizes that you can choose from. When you click one, the code will automatically change. Previously, I had chosen a 640pxs width, which was too wide. This time, I will try 560pxs and see how that works out. It is a little game of trial and error to get the right width size number, but you have to do that only once and then you can use the same number for all of your embedded objects. However, there might be sites where this option is not present. Then you will have to do this manually. After pasting the embed code into your post, just search for a line that has the word "width" in it. You will see that "width" is followed by a number just like the code in the YouTube example. Change the number to a size number that will fit your posting area and the size of your video will change.


